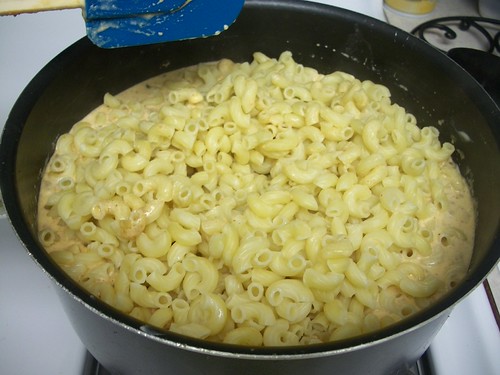
taco macaroni & cheese

macaroni and cheese is one of my favorite comfort foods.  i will admit i love the boxed kind or if we really feel like splurging velveta shells is the best.  don’t hate.  but i know, i know – of course homemade mac and cheese is delicious and definitely better than the boxed version full of (delicious) fake cheese.

plus, it’s always fun to try different kinds of macaroni and cheese recipes.  i’ve seen everything from cheeseburger mac and cheese to this taco mac and cheese.  it has all of the flavors of tacos incorporated into macaroni and cheese.  genius!

there is taco seasoned ground turkey (or beef), salsa, green peppers, onions, lots of cheese (cheddar and cream cheese), sour cream – all kinds of good stuff.  then i topped my taco mac and cheese with salsa, sour cream and cilantro; chris isn’t a fan of cilantro so i topped his with green onion instead.

be warned this recipe makes a lot of mac and cheese.  so it’s perfect for my style of meal planning (i just cook a couple dishes a week and chris and i eat for lunch and dinner) but if you don’t feel like eating the same thing every day, i would suggest making this for a potluck or maybe freezing instead.

first, cook the macaroni according to the package directions and set it aside.

now for the taco turkey – brown the ground turkey, onions, and green peppers.

then add the taco seasoning and garlic.  (p.s. homemade taco seasoning is the best.  try it out!)

throw in the salsa and stir it all together.

the taco turkey is ready.  set it aside as you work on the cheese sauce.

pour the milk, sour cream, and cream cheese into a medium saucepan (i’m lazy and didn’t want to dirty any more dishes so i just used the pot i boiled the macaroni in).

mix to combine and then cook until the cream cheese is melted, then add the shredded cheddar cheese.

stir until the cheese is melted.

pour the taco turkey to the cheese sauce and mix to combine.

add the cooked macaroni…

lastly, stir everything together and add salt and pepper to taste.

the taco mac and cheese is ready to eat!

the recipe for this taco mac and cheese can be found here on cassie craves.

four cheese ravioli

so remember those salted caramel brownies?  yeah those were good, well on the same day that tammy and i made the brownies we also made four cheese ravioli with a broccoli cream pesto.  boy was it good – it was actually so good that i made the dish again the next weekend.  i just got my ravioli press in the mail so i wanted to try it out.

i love using the ravioli press – you can make so many at once.  12 of them!  yes!  but when tammy and i first made ravioli we didn’t have one.  so i’ll show you both ways.  i also learned some great tips and strategies when using a ravioli press after having too many of them lose their filling while they’re boiling.  i hope they help you when you try your hand at ravioli making.

this four cheese ravioli is super flavorful – it has of course, four different kinds of cheese: ricotta, mozzarella, provolone, and parmesan as well as a few different herbs including basil, oregano, and parsley plus some garlic too.  they are great with this broccoli pesto or marinara sauce.  although they take some work, it’s well worth it once you bite through the fresh, perfectly cooked pasta and then into the flavor packed, gooey cheese.

of course, the ravioli making process starts with fresh pasta.

roll it out according to your past maker’s instructions.  i have the atlast 150 pasta maker and i roll out my dough to the number 5 or 6 setting and found that it was the perfect thickness for ravioli.  you don’t want it too thick because the edges of the ravioli is double the thickness of the dough, so it may get chewy and not cooked thoroughly – and you don’t want it to thin because then it will tear and not have enough give to make room for the filling.

now that your pasta is ready, it’s time to mix up the filling.  combine all of the ingredients (cheese, herbs, garlic, salt, pepper and egg) into a medium bowl.

mix it all up and your ravioli filling is ready.  easy peasy!

now time to assemble the ravioli.  first up, here’s how to make the ravioli if you don’t have a ravioli press.  place the pasta sheet on a floured surface.  then on the bottom half of the sheet, spoon about scoops of 2 teaspoons of filling about an inch apart.  then using your finger or a pastry brush and a small bowl of water, wet the pasta around the filling.  this will help the top half of the sheet of pasta stick to the bottom and seal in the filling.

fold half the pasta sheet over the side with the filling.

carefully press out any air from the filling area, like so.

next using a pastry cutter, cut the filled pasta sheet into raviolis.

place the finished raviolis on a floured baking sheet and allow the pasta to dry for 1 hour.

though this process works fine, i love using my ravioli press.  it’s so much faster and easier.

start by laying a sheet of pasta over the metal part – be sure the side of pasta that is touching the metal is well floured. this will keep the ravioli from sticking to the press which is a real pain in the you know what.

then use the plastic bubble looking part and press bubble side down on to the pasta sheet.  this make little pockets or wells for you to put your filling in.

now brush the pasta, between the wells, with egg wash (egg mixed with a little water).  this will help the pasta sheets stick to one another and seal in the filling.

next fill each well with about 2 teaspoons of the four cheese filling.  i used a small cookie scoop which made it super fast and easy.

see, quick like a bunny.

now place another pasta sheet over the filling and gently press down to seal.

okay so now the instructions says to take a rolling pin and roll over the pasta to make sure the raviolis are well sealed and formed.  so that’s what i did…

looks good right?

but then it was impossible to get the ravioli out of the press.  no matter how hard i banged the press against the counter they refused to get out.  so i pried them out and it was a mess.

so instead, i skipped the rolling pin part and just pressed the top pasta sheet just gently enough so that i knew the ravioli were sealed and the pasta was indented with the zigzag lines.  then i used a pastry cutter to cut the ravioli, following the lines made by the press.

it worked so much better and the ravioli stayed nicely shaped.  yippee!!!

after the ravioli has dried, boil these bad boys up and serve it with your favorite sauce.

i cannot tell you how excited i am to be able to make my own ravioli.  there are so many different kinds that i can’t wait to try!!!!  be on the look out for lots more ravioli filling recipes.  yay!!!

(more…)

fresh pasta

for valentine’s day, chris got me this beautiful pasta maker.

oh my goodness was i excited when he gave it to me.  i have wanted a pasta maker for so long.  i originally looked at the kitchen aid attachments but they were just so gosh are expensive.  so i put the idea aside and made pasta by hand.  okay, i only did it once and it was terrible so i never did it again.  but with this amazing contraption, i am finally able to make my own pasta.  yayyyyyyyyyyyy!!!!!!

chris and i tried out the pasta maker for the first time a few weeks ago and made some fettuccine.  it was divine.  so different from dried pasta you buy at the store.  the texture is so light and delicate and just amazing – i don’t know how to describe it.  we served our fettuccine with a homemade roasted garlic and sausage sauce.  yum.

you know what i was most surprised by?  making fresh pasta isn’t as hard as you may think.  if you have a pasta maker it is really pretty easy.  plus it only calls for 2 ingredients!  yes only 2!  just flour and eggs.

so to make the pasta, just pour the flour on to a clean surface (i used an amazing roul’pat – similar to a silpat but made just for rolling out dough.) and form a well in the middle.  then add the eggs to the well.

then scramble the eggs with a fork.

that’s not scrambled!  this is scrambled.

now slowly start incorporating the flour into the scrambled eggs.

keep going until the flour is mixed in.

it will look like a big ol’ shaggy mess.  don’t worry – it’ll be okay.

knead the dough with your hands and magically it starts to form a cohesive ball.

keep kneading the dough until it’s a smooth ball – about 3 more minutes.  once the ball is “elastic and a little sticky” knead 3 more minutes.

then wrap the ball in plastic wrap and allow the dough to rest for 20 minutes.

now it’s time to make the pasta.  just follow your pasta maker’s instructions and roll out the dough to your desired thickness.  here are some pictures of tammy and i rolling out pasta for our three cheese ravioli (recipe coming soon!)

then you can make any kind of pasta from fettuccine like this (don’t you like our makeshift pasta drying rack?  haha.  i just ordered real one and i can’t wait to use it).

or ravioli like this.

lots more pasta recipes will be coming up.  i know i will be making good use of my pasta maker.  thanks chris!!! ❤

(more…)

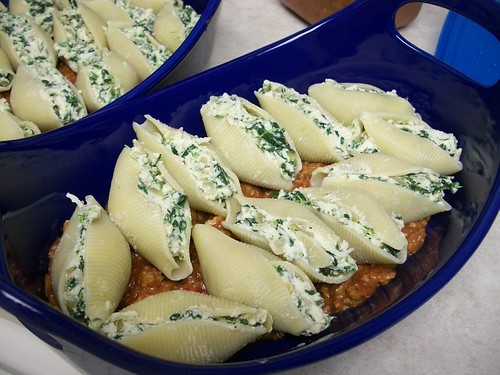
spinach and ricotta stuffed shells

sorry the picture above is not all that pretty.  but you know what the one downside with food blogging is?  having to wait to eat dinner because you’re trying to style your food just right so that you can take a pretty picture to post on your blog.  poor chris has to wait all the time – just one more second and we can eat, i promise!  a million seconds later and it’s finally time to eat.

well sometimes, i’m just so hungry that i’m not able to take all the time i would like to make the plate of food pretty.  this happened when i made these spinach and ricotta stuffed shells for dinner.  it was already past our dinner time and when i’m hungry, i get just a little cranky.  so i just plopped a few of the shells on a plate, snapped a couple pictures and we dug in.

so please forgive me for the less than beautiful pictures, but please don’t let that keep you from trying out this recipe – because it’s amazeballs.  yes, that’s totally a word (anyone else watch giuliana and bill?).

anyway, i stuffed the shells with a flavorful mixture of spinach, ricotta cheese, garlic, onions and herbs and then topped it all with some crockpot bolognese sauce and melty mozzarella cheese.  if you don’t happen to have bolognese sauce on hand (but who really does?  we only had some since i was on a crockpot/slow cooker kick) just use a large can of diced tomatoes or a large jar of your favorite pasta sauce.  the original stuffed shells recipe i used had sausage in the stuffing mixture, but i took it out since the bolognese sauce already had meat in it.  but if you plan on using just diced tomatoes or pasta sauce, i would definitely suggest adding the sausage back in.

start by boiling the shells.

once they’re done, rinse and drain the shells well and set them aside to cool.

then make the filling mixture.  saute some onions and garlic in 1 tablespoon of olive oil.  once the onions are translucent, turn the heat off and allow the onions and garlic to cool.

in a large bowl combine the ricotta cheese, spinach, parmesan cheese, mozzarella cheese, breadcrumbs, egg, salt, pepper, and basil.

then add the onions and garlic.

now the filling mixture is ready to be stuffed into the shells.

get ready, this is going to make a lot of shells,  so get 2 pans ready one 9 x 13ish and 1 8/8ish pan.  spread a little bit of the sauce on the bottom of each pan.

then start stuffing the shells and line them up in the pan.  big pan done…

and the little one.

now spread some bolognese sauce over the shells.

cover each pan with foil.

then bake at 375 degrees F for 30 minutes.  take the foil off and sprinkle mozzarella cheese over the sauce,

and bake uncovered for another 10 minutes or until the cheese is melted.

i’ll warn you, it’s going to smell really really good and you’re going to want to dive right in.  once you try it, hopefully you won’t blame me for not wanting to wait and take pictures and you too will want to just gobble these spinach and ricotta stuffed shells up.

(more…)

crockpot italian turkey meatballs

and i’m back in the game!

does anyone recognize that quote?  it’s from one of my favorite movies, 10 things i hate about you.  you remember the part when joseph gordon-kevitt’s (the guy from (500) days of summer) character kisses larisa oleynik’s (alex mack) character and then she gets out of the car and he says, “and i’m back in the game!” and then he hits the steering wheel.  i used to watch it on vhs over and over again when i was younger.  sooo good.

anyway, we’re back to slow cooker/crockpot recipes with these crockpot italian meatballs from skinny taste.  i hadn’t ever made meatballs in the crockpot before – i used to just bake them.  but after trying this recipe, i think this may be the only way i make them.  the turkey meatballs were so tender and flavorful.  plus the tomato sauce was equally delicious.

(uncooked meatballs)

since the recipe makes quite a bit of meatballs, we had them 2 ways – first we made meatball subs and then we just had the meatballs and sauce over some pasta (i forgot to take a picture.  sorry!)

first up, the  sauce.  just pour the crushed tomatoes into the slow cooker and add the roasted garlic and bay leaf (i also may or may not have added about 1/4 cup of red wine too).  mix to combine.

now, the meatballs.  put all of the meatball ingredients in a large bowl – ground turkey, egg, parsley, parmesan cheese, garlic, salt, pepper, and italian seasoned breadcrumbs (i didn’t have any in my pantry so instead i used panko breadcrumbs and 1/2 tsp of italian seasoning).

mix everything together…

and form the meatballs.  i used about a rounded tablespoon of the ground turkey mixture of each meatball.  then plop them into the sauce.

set the slow cooker to low and cook for 4-6 hours.  once the meatballs are done, add salt and pepper to taste along with some chopped basil (i used my trusty basil in a tube).

if you want to make some meatball subs like we did, all you need to do is put about 4-5 meatballs on a sub roll.

then sprinkle some mozzarella cheese, garlic powder, and italian seasoning on top.

finally, broil the sandwich until the cheese is melted and the bread is toasted.

nom nom nom.

for the recipe for these simply delectable crockpot italian turkey meatballs, please visit skinnytaste.